Creating UrbanCode Deploy tasks#
Use UrbanCode Deploy tasks to run UrbanCode Deploy applications.
Before you can use UrbanCode Deploy tasks in pipelines and deployment plans, you must first configure an UrbanCode Deploy integration.
The applications that are available to a deployment plan depend on the team that is assigned to the plan. The applications that are managed by the team in UrbanCode Deploy are also available in HCL™ Accelerate.
To create this task type, specify the application's process, version, and environment. You can set the version and environment at design time or select them at run time. When you run this task, the application runs in the integrated UrbanCode Deploy instance. During deployments, UrbanCode Deploy tasks start automatically when they become eligible to run.
To create an UrbanCode Deploy task, complete the following steps:
-
On the Deployment plan detail page, click Create Task.
If you want to insert a task at a specific position in the plan, select a task before using the Create Task. The new task is inserted above the selected task.
-
On the Create Task dialog box, in the Type list, select UrbanCode Deploy.
-
In the Name field, enter a name for the task.
-
In the Application Name list, select an application.
-
In the Process list, select or enter an application process.
Processes that belong to the selected UrbanCode Deploy application are available.
-
In the Environment list, select or enter an application environment.
Environments that belong to the selected UrbanCode Deploy application are available. To postpone selecting an environment until you are ready to run the deployment, click Versions on the deployment plan detail page.
-
In the Version list, select an application version.
Versions refer to UrbanCode Deploy application snapshots. Versions that belong to the selected application are available. To postpone selecting a version, select Use Version Tab. If the application process does not require a version, select No version items exist. You might select this last option if you are running a configuration-type process that does not require components.
-
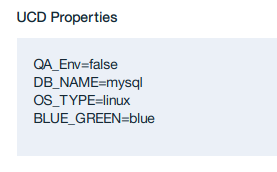
In the UCD properties box, enter the properties that you want to pass to the UrbanCode Deploy application.
Properties are name-value pairs. You can enter multiple properties. Put each property on a separate line. The following graphic provides an example of property definitions:

-
In the Duration (minutes) field, enter the number of minutes that you expect the task to run until it is completed.
The estimated duration is used to calculate expected deployment times.
-
In the Tags list, attach a tag to the task.
You can select multiple tags. To create a tag, type the tag name in list's text field.
-
Click Save.
The task is inserted into the deployment plan.
After the task is created, the plan's Versions page is updated with information about the application. If you selected Only Changed Versions for the application environment and version on the Create Task dialog box, use the Versions page to set those options before running the deployment.
Parent topic: Tasks